Assalamualaikum, Hi all
Last Weekend, i went to Warehouse Cosway at USJ with my sister, brother in law and nephew. Well I not shopaholic. I only buy digital weighing which is RM20.00.
After that we went to Mydin Mall Subang. I buy oven RM99.00, Stand Mixer RM34.90, tart mold RM6.60, semperit mold RM6.90, Aiskrim mold RM1.60, Baking tray rm 7.90
Monday, June 16, 2014
Friday, May 30, 2014
Candy Crush Saga
Assalamualaikum uols...
#YesterdayStory
Yesterday I went to mcdonald to by Sundae Cone after work. After that go to temporary bus stop in front ofTesco Extra. I played candy crush saga to get rid of bored. Suddenly bus comes but I miss to see the number of bus mini. Don't feel to go to the bus to see the number of bus. Suddenly, after the miss bus move, bus mini 68 comes, so that means the miss bus just now is bus mini 88.
After 1 hour waiting, i make decisions to wait for the bus across the street. This decisions makes after i saw two ladies make her decisions to wait for the bus across the street too.
The fate of Allah SWT, I met a girls that blur which bus stop should she waiting there. The girls is from UTHM batu pahat what to spend her study weeks in her sister's house.
So, maybe the fate that I got late bus because Allah SWT wants to give me pahala by help the girls.
#TheEnd
Wednesday, May 22, 2013
Simple Basic Image Viewer Using NetBeans
1. Choose
File > New Project. Alternatively, click the New Project icon in the IDE
toolbar.


2. In
the Categories pane, select the Java node. In the Projects pane, choose Java Application.
Click Next.

3. Type
GUI in the Project Name field and specify a path as the project location.

4. Ensure
that the Set as Main Project checkbox is selected.
5. Deselect
the Create Main Class checkbox if it is selected.
6. Click
Finish.
7. Create
a JFrame Container
a. In
the projects window, right-click the GUI node and choose New > JFrame Form…

b. Enter
OpenImage as the class name.
c. Enter
my.GUI as the package.
d. Click
Finish.

8. Adding
Components
a. Choose
Window > Palette

b. Start
by selecting a Label from the Swing Controls category on Palette and drop it
onto the JFrame.

c. Add
button

9. Making
the Button work:
a.
Click on the jButton1, go to the
Properties window, and change text jButton1 to Open Image.
b.
Click Code and rename Variable Name to openBtn:

c.
Double-click on Open Image Button and
add functionality to make the “Open an Image” Button work with source code as
below:
private void
openBtnActionPerformed(java.awt.event.ActionEvent evt) {
FileDialog f = new FileDialog(this,
"Open File", FileDialog.LOAD);
f.setDirectory(directory); // Set the default directory
// Display the dialog and wait for the
user's response
f.show();
directory = f.getDirectory(); // Remember new default directory
filepath = directory+f.getFile();
BufferedImage img = null;
try {
img =
ImageIO.read(new File(filepath));
imageLabel.setIcon(new javax.swing.ImageIcon(img));
}
catch (IOException e) {
System.err.println("I
could not load the file \'"+directory+"'. Sorry.");
}
}
}
10.
Run the project


Simple Basic Image Viewer Using Visual Studio C++

2. Form1 will appear:

3. On the Properties in right side, change Text Form1 to Open Image.

4. Select View > Toolbox


9. Copy paste code below as shown below:
OpenFileDialog ^ openFileDialog1 = gcnew OpenFileDialog();
openFileDialog1->Filter = "JPeg Image|*.jpg|Bitmap Image|*.bmp|Gif Image|*.gif";
openFileDialog1->Title = "Select a Image File";
if (openFileDialog1->ShowDialog() == System::Windows::Forms::DialogResult::OK)
{
pictureBox1->Image=pictureBox1->Image->FromFile(openFileDialog1->FileName);
}


Simple Basic Image Viewer Using MATLAB
1. Change current folder to where you want to save your MATLAB files.
 11. Now let me explain the use of all two components in this tutorial.
Push Button: we are going to use Push Button as to open file browser for selecting image file.
Axes: we are going to use axes as image viewer which ever image we will select it will be displayed in axes.
12. Now let’s change the Properties of push button according to our function. Keep the cursor on Push Button and press Right Click and select "Property Inspector".
 13. For Push Button
String: Open Image
Tag: open_button
 14. Repeat step 12.
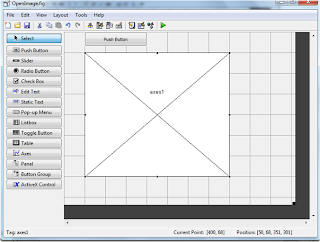
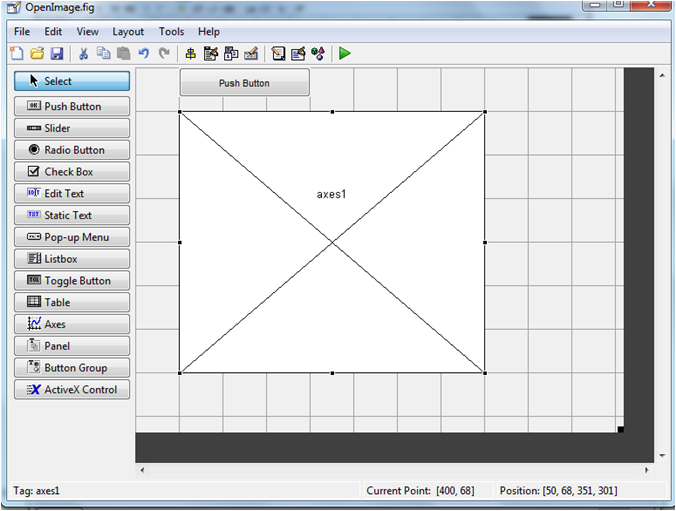
For axes change its "Tag" properties from "axes1" to "img_display"

[filename, pathname] = uigetfile({'*.bmp';'*.jpg';'*.gif';'*.*'}, 'Pick an Image File');
img=imread([pathname,filename]);
axes(handles.img_display);
imagesc(img);
set(handles.img_display,'Visible','off');
guidata(hObject, handles);


2. Click on GUIDE icon to open “GUIDE”.


3. The GUIDE Quick Start window will be appeared. Select Blank GUI (Default) and press Ok.
 4. Now when you click ok, you will see a GUIDE window.
 5. Click File > Preferences… to open GUDE Prefrences.
 6. Check first checkbox to show names in component palette, and then click Apply and Ok button.
 7. Now you will see names in component palette.
 8. Save this file as your desired location.
 9. Here I am saving this file as OpenImage. Now friends note here when you save this file for first time, two file will be generated with ".m" and ".fig" extension. For me it will be "OpenImage.m" and "OpenImage.fig”.


10. Now let’s drag and drop push button and axes components in drawing area and adjust them as showed in below figure.
Push Button: we are going to use Push Button as to open file browser for selecting image file.
Axes: we are going to use axes as image viewer which ever image we will select it will be displayed in axes.
12. Now let’s change the Properties of push button according to our function. Keep the cursor on Push Button and press Right Click and select "Property Inspector".

String: Open Image
Tag: open_button

For axes change its "Tag" properties from "axes1" to "img_display"

15. Now as we have set all the properties save the file and switch to OpenImage.m file. Now find the Callback function for "open_button" push button.
 16. Copy paste code below:

[filename, pathname] = uigetfile({'*.bmp';'*.jpg';'*.gif';'*.*'}, 'Pick an Image File');
img=imread([pathname,filename]);
axes(handles.img_display);
imagesc(img);
set(handles.img_display,'Visible','off');
guidata(hObject, handles);

17. Now save and Run file.

Wednesday, May 15, 2013
Gaussian Blur Effect
1. Open suitable picture.
2. Choose Magnetic Lasso Tool from the Tools menu.

 4. Go to the Main Menu and choose Select > Inverse.


 7. The result:

2. Choose Magnetic Lasso Tool from the Tools menu.

3. Select the subject of picture using Magnetic Lasso tool and double-click after finish select the subject.


5. Now the background is selected. Let’s apply the blur effect by go to Filter > Blur > Gaussian Blur….

6. Choose suitable radius:


Halftone Dots and Linear Light
1. Open the image to add the linear light and halftone dot effect tool.


3. Make sure foreground color is white and your background color is black.


2. Duplicate the image layer.

4. With the "Background copy" selected, select Filter > Sketch > Halftone Pattern from the menu bar.

5. Use the setting in the image below or play around some. Click "OK" when done.

6. To invert the halftone. Hold down CTRL key and press I. Image should now look something like below:

7. Select the “Background copy” layer and change its mode from "Normal" to "Linear Light".

Image should be like this
8. To adjust brightness, select Image > Adjustment > Brightness/Contrast.

9. The final result:

Subscribe to:
Posts (Atom)